Customization
Adapt the email form and the subscriber's dashboard to your needs.
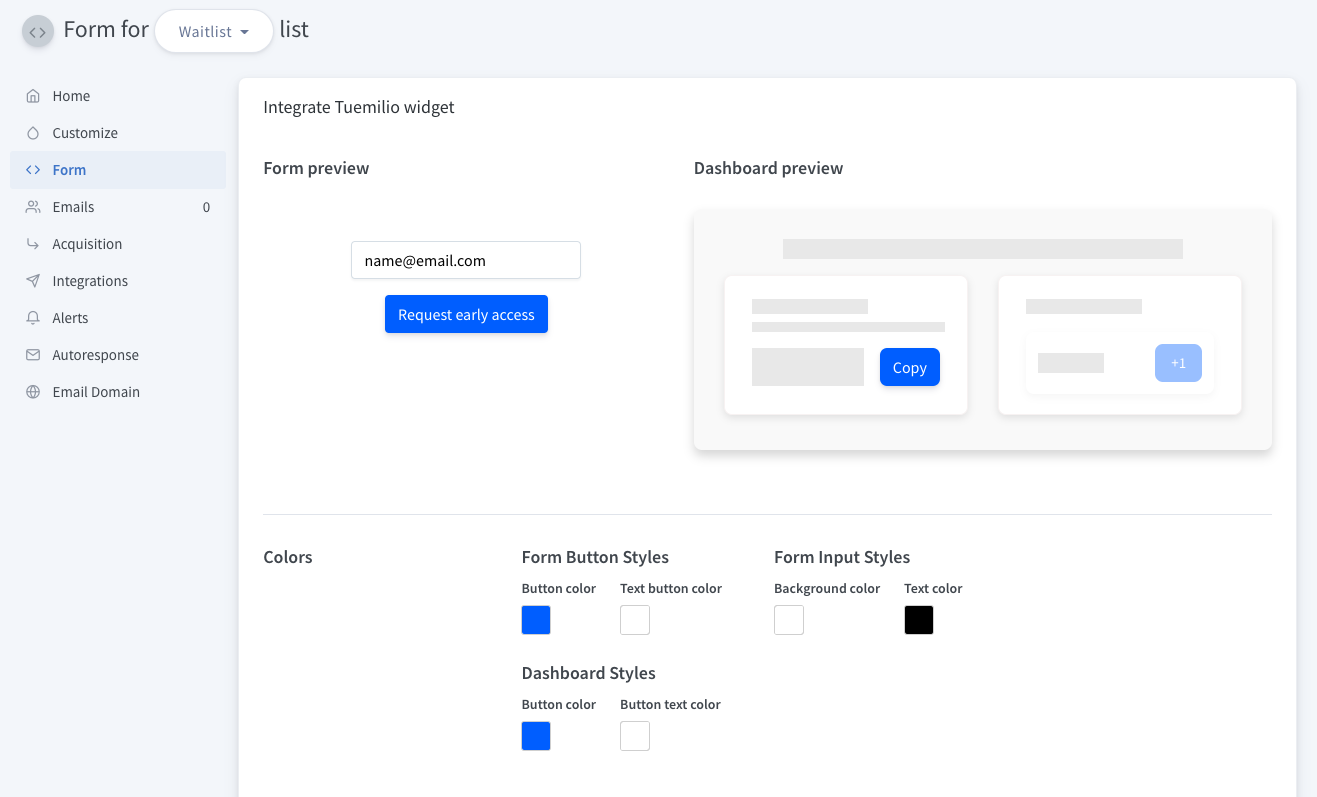
Form
Customize the colors, texts, and fields.
WARNING
Always reinstall your Form Code on your site each time you add changes to your colors, texts, fields, etc.
Colors
You can select the button and button text colors for the form and the dashboard — also the input text and input background color.
Custom Fields
Add custom fields to the form by clicking the "+Add custom field."

You can change the fields' order by drag&drop and check how it looks on the form preview.

You can access the data from the custom fields when inspecting a subscriber.
Custom fields will be included dynamically on the popup dashboard and email automations using @ + field name and also when exporting contacts.

Radio Buttons
You can add manually radio buttons to your form as well. Find the <div class="t-signup"></div> tag on your Form Code
and add inside the HTML for your radio buttons:
<div class="t-signup">
    <p>Select a size:</p>
    <label>
        <input name="size" type="radio" value="little" checked="">
        <span>Little</span>
    </label>
    <label>
        <input name="size" type="radio" value="big">
        <span>Big</span>
    </label>
</div>
Texts
Customize here all texts related to the form. If an issue occurs, submitting the form, a feedback text will appear.

Inline Form
If you need to display your form inline, activate the Inline Form switch on the Form page.

Subscriber's Dashboard
Configure the cards that appear on the subscriber's dashboard and its layout by dragging and dropping.
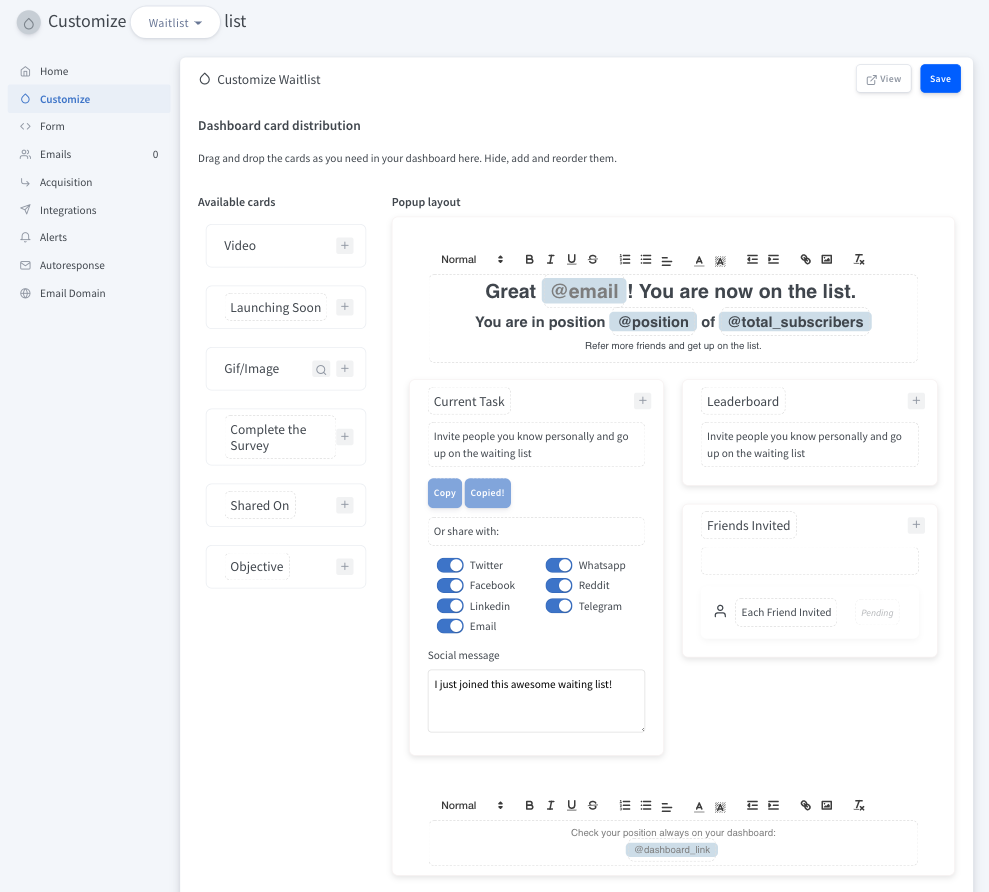
Drag cards from the Available cards column and drop them in the Popup layout to make them available in the subscriber's dashboard.
Hero/Footer Card
Write your custom text in your subscriber's dashboard header and footer.

Add merge tags typing "@" to display subscriber's data. You can choose between subscriber's email, position, points, referreds, referral link, and dashboard link and total subscribers of your list.
NEW
If you have custom fields on your form, you'll be able to display dynamically its data on the dashboard using @ + field name.
A custom field called name can be displayed using @name.

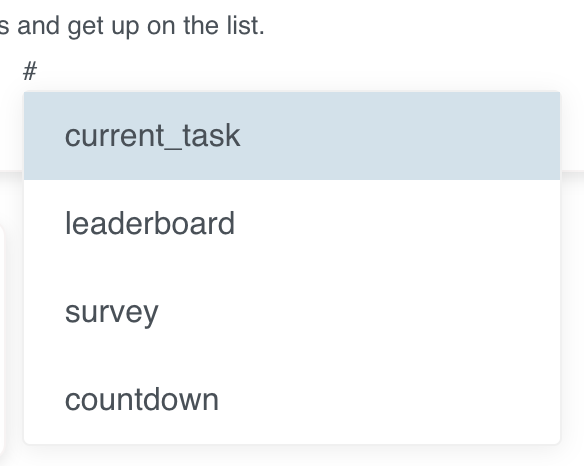
For a simplified dashboard, you can add centered cards in between your text by typing "#." Select between current task, leaderboard, survey, and countdown.
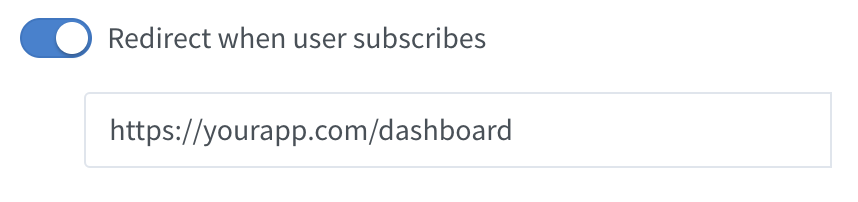
Redirect
For redirecting users to a different URL when they subscribe, switch on "Redirect when the user subscribes" and add a URL.
Later, when a subscriber has already joined and revisits your landing page, he will see a "Dashboard" button instead of a form. When they click it, they will be redirected to the dashboard.
The dashboard link the subscriber receives will be your landing page + ?uuid=subscriber-unique-identifier. When clicking the dashboard link, the subscriber will go to your landing page and immediately be redirected to the dashboard page. This way, if you change the dashboard page link in the future, your subscriber's links will still work.
WARNING
On the URL you want to set the subscriber's dashboard, you'll need to configure Tuemilio to embed the dashboard on the page instead of as a popup. Read the next section for more information.
You can also build your own dashboard using the dashboard data coming from the Javascript API.
Embedded Popup
You can embed the subscribers' dashboard on a page instead of a modal. This is useful when redirecting the subscriber to a specific URL after subscribing.
You'll need to install the form code also on the redirected page. To tell Tuemilio to embed the dashboard,
add dashboard.type = "page" on the Tuemilio initialization Config Object.
Tuemilio('init', {
  "form": {
    //
  },
  "dashboard": {
    "type": "page",
  }
});
You only need to do this change on the page that will display the dashboard.
Surveys
You can add a survey on your subscriber's dashboard. This way, once they have joined the list, you can know more about them.
We recommend using a form from Typeform because they are easy and beautiful to answer. Also, and most important, Typeform let us track when a user finishes a form so that we can give them points for it.
You can also embed Google Forms the same way as a Typeform, but Google does not provide a way to know when a user submits a form. This means that we cannot give points to our subscribers once they finish the survey.
Typeform Hidden Fields
If you have a Professional plan on Typeform, Tuemilio automatically integrates hidden fields for the subscriber's email address and all the custom fields you have on your form.
You can use the following hidden fields on Typeform by default: @email, @referral_link, @dashboard_link, @points, @position, @subscribers_count.
Also, your custom fields will be accessible by its name automatically.
So if on your Tuemilio form you have a custom field named phone, you can use it on your Typeform typing @phone.
WARNING
Behind the scenes, Tuemilio will add automatically ?email=xxxx&custom_field=xxxx at the end of your Typeform link.
So on your dashboard, just add your Typeform sharing link without modifying it.
Add a second survey
It's possible to show a second survey once the user finishes the first one. The user will receive points each time they finish a survey. To do that, you can do the following:
- Add the first survey link as you would normally do on the subscriber's dashboard.
- Add the second survey link on the initialization object like this:
Tuemilio('init', {
  "dashboard": {
    "survey": {
      "secondURL": 'https://domingo18.typeform.com/to/lsRp6Y'
    }
  }
});
Other Settings
Here you can adjust the global settings of your waitlist.

- List Name: Change the name of your waitlist.
- Fire Confetti: Show a confetti effect when the user subscribes.
- Automatic integration with Google Analytics: Tuemilio will detect if Google Analytics is installed on your site. Tuemilio will send events to your Google Analytics account. When inspecting a subscriber on Tuemilio, you'll also have its GA ID stored.
- Custom Points Calculation: Select how many points a subscriber gets depending on two triggers.
- Points per invited friend: Points earned per each referral.
- Points per survey completed: Points earned by answering the survey card.
- Points per platform shared on: Points earned for each social platform where the subscribers shared their link.
Email Domain
You can add your own domain to the sending address of Tuemilio emails. We recommend using a subdomain with Tuemilio, like “list.mydomain.com” or "waitlist.mydomain.com".
Using a subdomain will let you use your root domain, e.g. “you@mydomain.com” for other email providers like Mailchimp or Gmail.

Once you add a domain, you will have to add the shown DNS records in your DNS provider.
- TXT records are obligatory for sending emails.
- CNAME and MX are optional but recommended for optimal delivery.

Once you make the above DNS changes, it can take 24-48hrs for those changes to propagate. When the Verified green badge appears on the top right corner, all emails will be sent with your domain.
CSS Styling
All the styling rules for the email form and popup are added at the end of the <head> of your website.
Just right after the closing tag </head>. So any style overriding needs to be done inside the <body> tag.
A good place could be just below the form code.
Style Inheritance
The modal elements will inherit as many CSS properties from your site as possible. So h1,h2,h3, p, button,
input will have the same font-family, color, and size as your landing.
CSS Classes
If further customization is needed, you can use any CSS class to override the styling. The main classes are:
.t-modal-content: Main modal window..t-hero-text: Hero text container..t-footer-text: Footer text container..t-card: Card container..t-card-header: Card header container..t-title: Card header title text..t-card-body: Card content container..t-paragraph: Card description text..t-content: Card specific elements container.t-shareon-row,.t-waitlist-row: List rows..t-button: Button class..t-primary-color: Accent color..t-input: Input class..t-button-dashboard: Dashboard button class..t-button-submit: Sign up button class..t-email: Email input field class..t-feedback-email: Form error text class.
Here an example for a dark mode modal:
<!-- Start of Tuemilio Code -->
...
<!-- End of Tuemilio Code -->

<!-- Add your custom styles here -->
<style>
    .t-modal-content {
        background-color: #181920;
    }
    .t-card {
        background-color: #2A2E3D;
    }
    .t-shareon-row, .t-waitlist-row {
        background-color: #2f3447;
    }
    .t-modal-share-input {
        background-color: #2f3447;
        color: #DFE4E6;
    }
    .t-primary-color {
        background-color: #285EF0;
        color: #DFE4E6;
    }
    h1, h2, h3, p, div, a {
        color: #DFE4E6;
    }
</style>